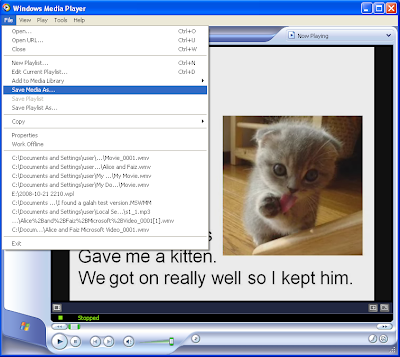
 Fig 45
Click on images to enlarge
Scroll down
Select ‘Save Movie File’

Fig 46
Select 'My Computer'.

Fig 47
Click ‘Next’.

Fig 48
Name the Movie when prompted. Click ‘Next’ again.
Note that it will be saved in ‘My Videos’. The next screen will ask if you require ‘Best quality’. Click ‘Next’ again. Then Click ‘Finish’.
It will save the file and open Windows Media Player automatically.

Fig 49
In the Windows Media Player window, click ‘File’. Choose ‘Save Media As’.
A text box will appear.

Fig 50
Click ‘Save’. The Movie will be saved in ‘My Playlists’.

Fig 51
Click ‘Media Library’.

Fig 52
The Movie will appear in the Media Library, in ‘All Video’, as a thin line of type across the top.
Select it and right click mouse button.

Fig 53
A drop-down box will appear which lists ‘Properties’ at the end. See green arrow.
Left click ‘Properties’ and copy and paste the URL that appears.
This URL will be used later to upload the video to the internet.

Fig 54
Location: C:\Documents and Settings\user\My Documents\My Music\My Playlists\Movie_0001.wmv
Copy the URL (See above) Note that it ends in wmv. This means that it is a WMV file. In this file format, it will upload easily to a Wiki or other websites.
Note: Because many people ‘share’ a Wiki or Moodle it is advisable to give the movie a unique name because Windows names everyone’s movie, ‘Movie_0001’ , by default